Configuring SAML SSO on AEM using WSO2 Identity Server
Oct 17, 2015 · 3 minute read · CommentsAEMSAMLWSOS ISSSO
Adobe AEM supports SSO using SAML. In this post we will show how to setup SAML SSO using WSO2 Identity Server as IDP.
As basis for this article we will use this blog post from AEM Stuff.
Add IdP public cert to AEM truststore
Following the steps described in the post we need to upload the public certificate from the IDP. To generate the public key for the WSO2 IS installation, we need to perform those steps:
- Open The command prompt and navigate to the folder: _WSO2ISFolder/repository/resources/security
- On this folder there is the Key Store for wso2: wso2carbon.jks
Run the following command to export the public certificate:
keytool -export -keystore wso2carbon.jks -alias wso2carbon -file wso2PubCert.cer
Put the wso2carbon keystore password: wso2carbon, then it will export the public certificate
Add SP key and certificate chain to AEM keystore (authentication-service)
After we created the Public Certificate, we need to upload it to the AEM TrustStore as described in the tutorial.
Then we need to add SP key and certificate chain to AEM keystore (authentication-service) as described in the tutorial.
WSO2 Identity Server - Service Provider Configuration
Before we configure the SAML Authentication Handler, we are going to configure the WSOS IS.
We need to create a new Service Proider in order to let AEM uses WSOSIS as an IDP. To do that we need to log into WSO2IS https://localhost:9443/carbon
Go to Identity > Service Providers > Add
We need to specify a Service Provider name, then we need to configure the SAML Web SSO. To do that we need to go into the section Inbound Authentication Configuration > SAML2 Web SSO Configuration and click Configure
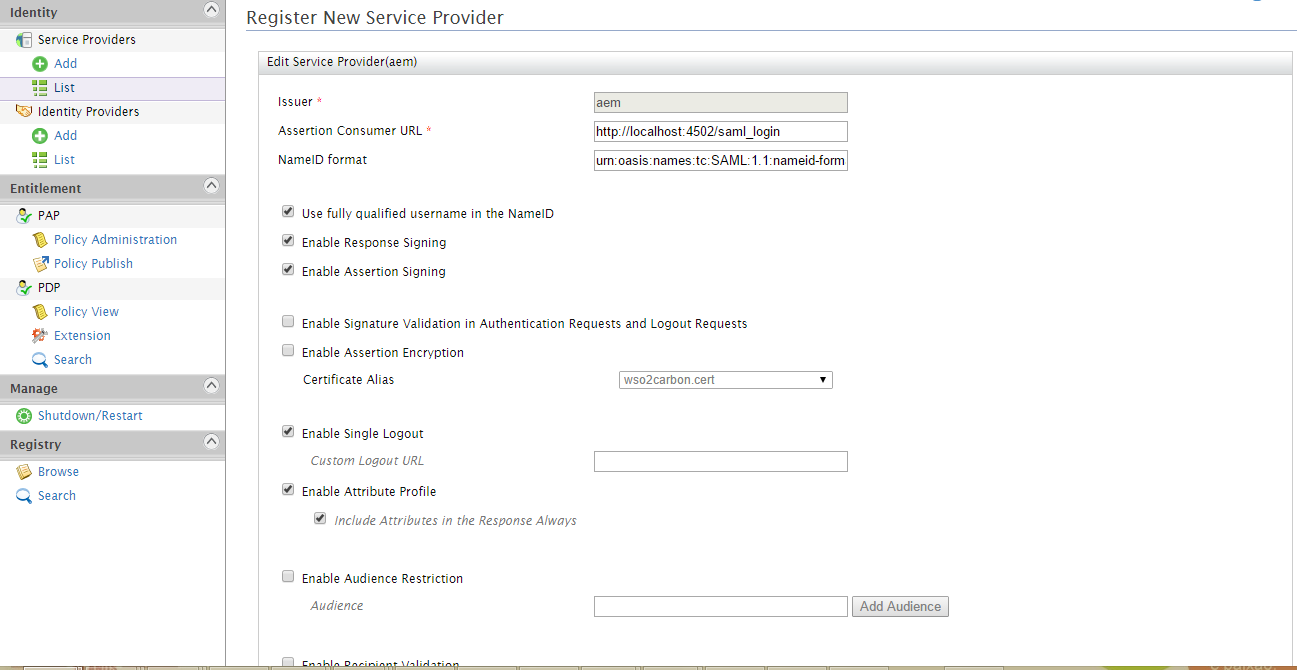
Then we need to provide the configuration for SAML SSO like the image below:

- Issuer: aem
- Assertation Consumer URL: http://localhost:4502/saml_login
- NameID format: urn:oasis:names:tc:SAML:1.1:nameid-format:emailAddress
- “Use fully qualified username in the NameID” option should be checked
- “Enable Response Signing” option should be checked
- “Enable Assertion Signing” option should be checked
- “Enable Single Logout” option should be checked
- “Enable Attribute Profile” option should be checked
- “Include Attributes in the Response Always” option should be checked
SAML Authentication Handler
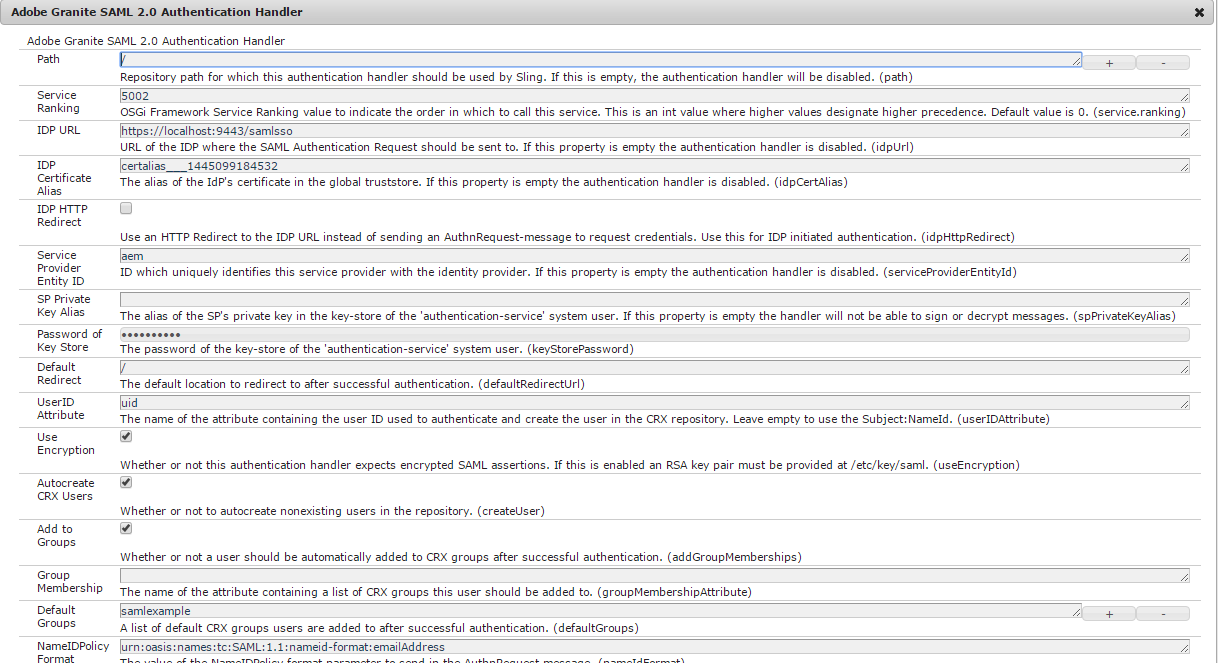
Then we need to configure the SAML Authentication Handler. Below we can see how the handler was configured to use WSo2IS:

- IDP URL: https://localhost:9443/samlsso
- IDP Certificate Alias: The alias of the certificate uploaded in the truststore.
- Service Provider Entity ID: The Service Provider id on IDP, we need to use the same as we used on Service Provider configuration on WSO2, in our example: aem
- Default Groups: The group the user will be added to after login
- NameIDPolicy Format: urn:oasis:names:tc:SAML:1.1:nameid-format:emailAddress, the same we have on Service Provider Configuration
After this we need to Configure Referrer Filter.
Testing the Configuration
After we performed all those steps, and if everything is fine, when we access aem:
http://localhost:4502
We will be redirected to WSO2IS login screen. The we need to use an user that is created on WSO2IS to log. After the login successful we will be redirected to the AEM.
If we go to the Users section Tools -> Operations -> Security -> Users, we can find the user we just logged into AEM created.created
An example on how it will work after the configuration can be seen in the video below:
I hope you enjoyed.
Thanks, see you in the next post.