Creating a Contact List App with Apache Sling
Jul 30, 2016 · 6 minute read · CommentsJavaApache Sling
In this Post we will create a Simple Contact List App using Apache Sling. This is a simple example that we will show how to use some sling tag libraries and the sling post servlet to create content in the repository.
To create this example we used the HTML from this snippet.
Setup the Application
In order to create our application the first step is to create our maven project.
We will use the sling-intitial-content-archetype archetype like we did in a previous post.
The only difference is on the folder strucutre and the maven configurations.
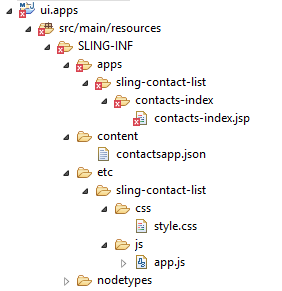
Our project structure can be seen below:

The changes in the maven configuration:
<Sling-Initial-Content>
    SLING-INF/apps/sling-contact-list;overwrite:=true;uninstall:=true;path:=/apps/sling-contact-list,
    SLING-INF/content;overwrite:=true;uninstall:=true;path:=/content,
    SLING-INF/etc/sling-contact-list;overwrite:=true;uninstall:=true;path:=/etc/sling-contact-list
</Sling-Initial-Content>
Explaning a little bit more:
- /apps: contains our rendition scripts, basically where that our node contents sling:resourceType will point to;
- /etc/sling-contact-list: contains our static files, JS and CSS.
- /content: contains our content. The main node is contactsapp with the resourceType set to sling-contact-list/contacts-index
The contacts-index.jsp is the script that will render our main page.
Integrate the HTML
Before starting working with the dynamic content from the repository, we started by adding the static HTML and the assets(js, css).
To hold our static assets we’ve created a new folder(sling-contact-list) under /etc.
Then we created our rendering script under apps, and in the JSP just put the static HTML in it.
This step is important to check if we added all the required assets to the static HTML works.
Creating the Contacts in the Repository
Our first step in our application is to create the contacts in the repository. For this we will use the built-in Sling Post Servlet. This is a default servlet provided by Apache Sling to handle POST requests. By using this servlet we can create/modify and delete content in the repository without need to create any backend code to do this.
A simple example can be seen below:
<form method="POST" action="http://host/some/new/content" enctype="multipart/form-data">
   <input type="text" name="title" value="" />
   <input type="text" name="text" value="" />
</form>
With this simple form it will create, in case it doesn’t exist, or update otherwise, the node /some/new/content by setting the title and text in the node.
All the possibilities of use of this servlet can be seen in the Apache Sling Docs.
In our code we will show some of the properties we can use with it.
We can see our form code below:
Let’s get the important parts of it:
form action="/content/contactsapp/contacts/*"
With this action in the form, we are saying to create a new node under the contactsapp/contacts node. The path ending with / or /* says that the node that will be created will have an auto generated name.
<input type="hidden" name=":redirect" value="/content/contactsapp.html" />
With the :redirect we specify where to redirect after the POST processing. In our exemple we are saying to get back to the home of our application.
The other input[type=“text”] fields will set the node properties. The only exception is the input[type=“file”]. Instead of setting node properties, it will create a node under the contact node created. This node will have nt:resource as its jcr:primaryType.
As we didn’t specify the jcr:primaryType of the node we are creating, it will be created as nt:unstructured.
To test our form, we need to deploy our application:
mvn clean install -P autoInstallBundle
Then access:
http://localhost:8080/content/contactsapp.html
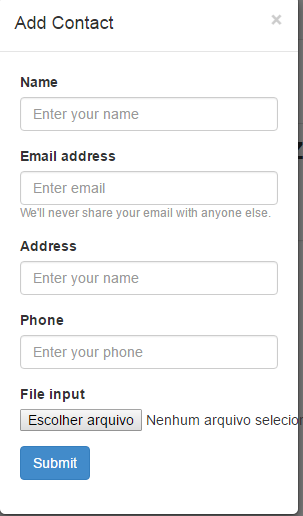
We can see our form below:

After filling the form fields and choosing an image, we can see the nodes created by using the explorer:

As we can see, it set the properties in the node created under contacts and also created a new one called contactImage that contains the image uploaded. Also, we can notice that it takes the name input value to create the node name.
Great! Let’s take the next step.
Displaying Our Contacts
To display the content we are storing in the repository we will change the contacts-index.jsp and we will use some taglibs and EL functions provided by Sling. We can find the taglib documentation here.
Firstly, we need to declare the taglibs by adding this to the JSP:
<%@taglib prefix="sling" uri="http://sling.apache.org/taglibs/sling" %>
<%@ taglib prefix="c" uri="http://java.sun.com/jsp/jstl/core" %>
We are going to use the Sling and JSTL taglibs.
Then we need to add this tag:
<sling:defineObjects />
This tag define objects that are regularly used when we are scripting the pages. Among the objects we have:
- resource: the current resource;
- slingRequest: SlingHttpServletRequest object;
In our exemple we will use only the resource object.
Basically our contacts will be stored under the contacts node that is under contactsapp node. Our app is accessible by this url: /content/contactsapp.html, so the resource object will represent the contactsapp node.
The main idea in the JSP is to get all nodes under /content/contactsapp/contacts and display their properties.
To retrieve the contacts node we will use the EL function: sling:getRelativeResource. We can see its use below:
<c:set var="contactsResource" value="${sling:getRelativeResource(resource,'contacts')}" />
So, what this code does is retrieve the path contacts relative to the resource. As we said before, our resource is contactsapp, so this code retrieves the contacts node under it.
Once we have the node that holds all our contacts. Now what we need to do is get the list of all child nodes. For this we will use another EL function: sling:listChildren. We can see it below:
<c:set var="contacts" value="${sling:listChildren(contactsResource)}" />
With this we are getting all child nodes and storing in the contacts.
After this we just need to iterate over the list using the c:forEach tag
<c:forEach var="contact" items="${contacts}" >
    <sling:adaptTo adaptable="${contact}" adaptTo="org.apache.sling.api.resource.ValueMap" var="contactProps" />
    <c:set var="contactImage" value="${sling:getRelativeResource(contact,'contactImage')}" />
We are not showing the whole loop, in this part we have one new tag: sling:adaptTo. This tag get an object and adapt it to an instance of the class defined in the adpatTo property. In our case we are adpating the Resource object into a ValueMap object to make easier to get the node properties.
In the other line we use the getRelativeResource to get the node that holds the image: contactImage.
Once we have the valueMap contactProps and the image, we can display the contacts properties:
<img src="${contactImage.path}" alt="${contactProps['name']}" class="img-responsive img-circle">
The properties we get as keys from the valueMap and the image path we use the contactImage node path. All the other properties are retrieved the same way.
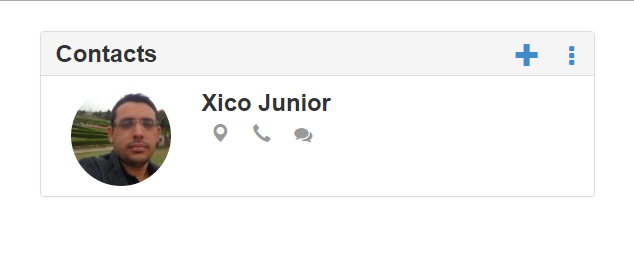
After deloying our changes, we can see them working in the image below:

You can find the source code in my github.
That’s it for today. I hope you enjoyed the post.