Enabling SSO on WSO2 API Manager 3.1.0 Carbon Console and Admin Portal with Keycloak
May 9, 2020 · 3 minute read · CommentsWSO2APIMAPIHow ToSSO
On WSO2 API Manager, we can enable SSO for its portals(publisher and developer portal). In this link we can see how we can use OKTA as an external IDP for authentication on developer portal and publisher. In this post we will show how we can enable SSO for the Carbon Console and Admin Portal using Keycloak.
Running Keycloak
For this example, I will be using the Keycloak docker image. To start the Keycloak container we can use the command below:
docker run -d -p 8180:8080 -p 8183:8443 -e KEYCLOAK_USER=admin -e KEYCLOAK_PASSWORD=admin jboss/keycloak
This command will spin up a Keycloak docker container that will use admin/admin credentials.
After that, if everything is working fine, we can access keycloak by hitting the following url:
http://localhost:8180/auth/
Configuring SSO for Admin Portal
The SSO configuration in admin portal is made by configuring the file:
[APIM-310]/repository/deployment/server/jaggeryapps/admin/site/conf/site.json
Configuring Keycloak
In order to enable SSO for the Admin Portal we need to create a Client in Keycloak.
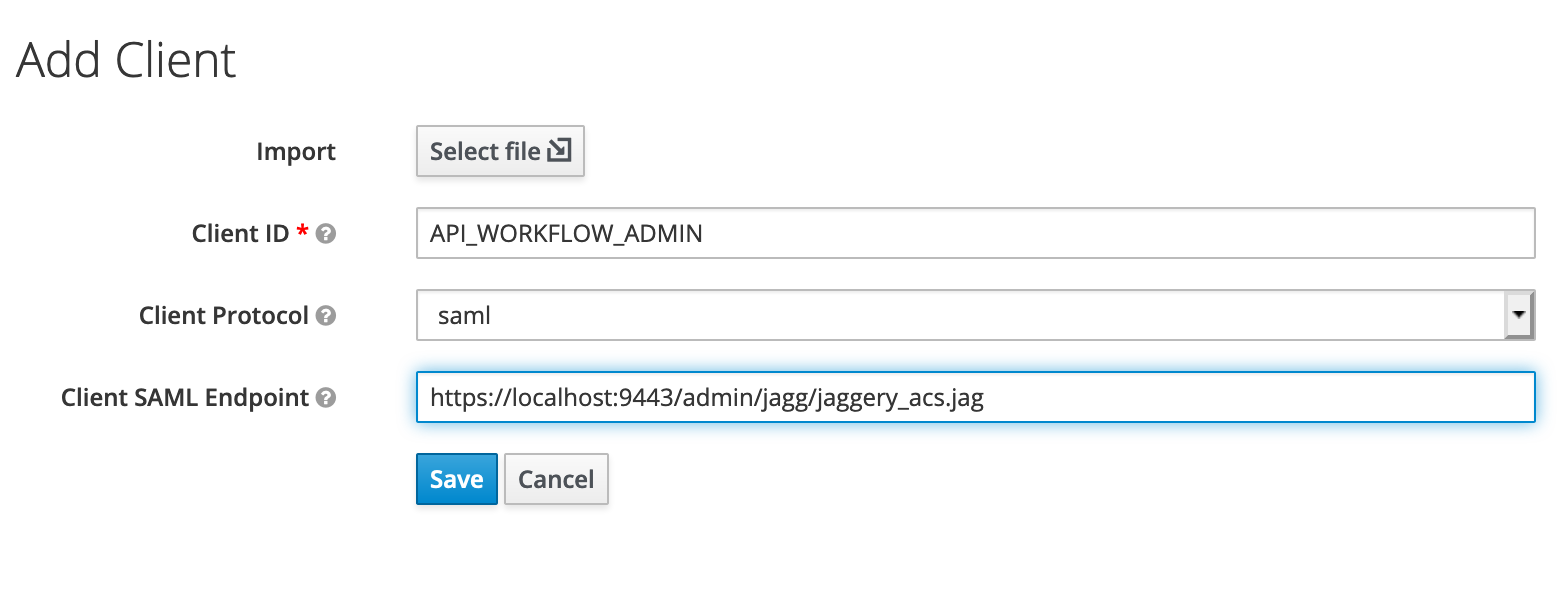
In the Keycloak Admin Console, we can create a client in Master Realm by clicking in the Clients option in the left Menu and then click on the Create button:

In the create client we need to provide the following information:

- Client ID: API_WORKFLOW_ADMIN
- Client Protocol: saml
- Client SAML Endpoint: https://localhost:9443/admin/jagg/jaggery_acs.jag
This Client ID will match with the issuer configuration in the site.json config file. The SAML Endpoint is the endpoint where Keyclock will post the SAML Assertion to WSO2 APIM 310 Admin Portal.
For making this process simpler, we will disable the “Client Signature Required” option, so we don’t need to deal with certificates.
Configuring WSO2 APIM 3.1.0 Admin Portal
We need to edit the below configuration file:
[APIM-310]/repository/deployment/server/jaggeryapps/admin/site/conf/site.json
We will configure it like below:
....
 "ssoConfiguration": {
    "enabled": "true",
    "issuer": "API_WORKFLOW_ADMIN",
    "identityProviderURL": "http://localhost:8180/auth/realms/master/protocol/saml",
    "keyStorePassword": "",
    "identityAlias": "",
    "keyStoreName": "",
    "verifyAssertionValidityPeriod": "true",
    "audienceRestrictionsEnabled": "true",
    "responseSigningEnabled": "false",
    "assertionSigningEnabled": "false",
    "assertionEncryptionEnabled": "false",
    "signRequests" : "true",
    "idpInit" : "false",
    "idpInitSSOURL" : "http://localhost:8183/auth/realms/master/protocol/saml?spEntityID=API_WORKFLOW_ADMIN"
    //"externalLogoutPage" : "https://localhost:9443/samlsso?slo=true"
    //"loginUserNameAttribute" : ""
  }

...
The changes we made were in the following settings:
- enabled: true
- identityProviderURL: http://localhost:8180/auth/realms/master/protocol/saml
- responseSigningEnabled: false
- assertionSigningEnabled: false
After that, we need to restart APIM. If everything was correctly set up, if we try to access https://localhost:9443/admin, it will redirect to the Keycloak login page and after a successful login it will redirect to the Admin portal.
Configuring SSO for WSO2 APIM 3.1.0 Carbon Console
For Carbon Console configuration that needs to be done at the file:
[WSO2APIM_310]/repository/conf/deployment.toml
Configuring Keycloak
In Keycloak we need to create a new Client with the following information:
- Client ID: carbonServer
- Client Protocol: saml
- Client SAML Endpoint: https://localhost:9443/acs
As we did in the previous configuration for Admin, we need to disable the “Client Signature Required”. And for Carbon Console, we need an additional configuration in the “Valid Required URIs” and add https://localhost:9443/acs

Configuring WSO2 APIM 3.1.0 Carbon Console
We need to edit the below configuration file:
[WSO2APIM_310]/repository/resources/conf/deployment.toml
We will configure it like below:
[admin_console.authenticator]
saml_sso_authenticator.enable = true
saml_sso_authenticator.config.ServiceProviderID = "carbonServer"
saml_sso_authenticator.config.IdentityProviderSSOServiceURL="http://localhost:8180/auth/realms/master/protocol/saml"
saml_sso_authenticator.config.AssertionConsumerServiceURL = "https://localhost:9443/acs"
saml_sso_authenticator.response_signature_validation_enabled = false
saml_sso_authenticator.assertion_signature_validation_enabled = false
This is enabling SAML SSO Authenticator and specifying the SSO Configuration.
In order to find the keys that I needed to use for this configuration I looked into these files:
- [WSO2APIM_310]/repository/resources/conf/keys-mappings.json: This contains all the keys we can use in deployment.toml;
- [WSO2APIM_310]/repository/resources/conf/default.json: This contains the default configurations if we dont specify those keys in the deployment.toml;
After that, we need to restart APIM. If everything was correctly set up, if we try to access https://localhost:9443/carbon, it will redirect to the Keycloak login page and after a successful login it will redirect to the Admin portal.
I hope this helps! See you in the next post.